I am having fun fitting the mock up of my 1911 corset. I was thinking about what purpose it will serve once it is done. So I thought I could make it part of a whole ensemble. I'm still not sure where I would wear it though. I thought I'd share some inspiration images of early teens fashions.
To see more early teens inspiration see my Pinterest board here.
I also made a board of corset inspiration here.
Monday, January 23, 2012
Early Teens Inspiration
Labels:
1910s,
1911,
1912,
Inpiration,
project planning,
titanic
Thursday, January 19, 2012
1911 Sew Along: Enlarging the Pattern
 |
| My patterns, enlarged and altered |
So here's the method that I use, though not the only one. I find this is pretty fast and painless. I enlarge in Photoshop or Gimp (I actually prefer Gimp for this even though I have both). There's a couple of tricks I've developed that help with this. Here's my process:
I scan the image into my computer and open it up with the pattern editing software. If I am dealing with many pieces, I isolate one pattern piece by cropping the rest out. Then I set the canvas size to 8 1/2" by 11" which is the size of my paper I am going to print on. Then I enlarge the image 800% (when the scale is 1/8" = 1"). The pattern piece is then larger than the canvas. I move the pattern around saving each 8 1/5" by 11" piece to my computer. Now when I have a large piece that has a basic shape or has a long straight line, it can get confusing when taping everything together to determine where exactly they match up. So I, with my pencil tool, draw little squiggly lines on the seam between two pieces. That way, it is possible to match the squiggly lines up when taping. The more squiggly line you draw the more accurately you can line everything up. Finally print everything out, match up the squiggly lines, tape everything together, and alter the pattern as needed.
Wednesday, January 18, 2012
1911 Corset Sew Along: Inspiration
I participating in the 1911 Corset Sew Along over at Bridges on the Body. I've never made a corset before, so I figured this would be a great time. I'm making the 1911 corset from Norah Waugh's Corsets and Crinolines. I've previously made patterns from The Cut of Women's Clothes: 1630 - 1930, so I am excited to finally make a corset!
I got some plain white coutil. I plan of getting some extra wide lace to trim with. Here are some period corsets I've been looking at for inspiration.
Love the color and the extra-wide lace. This is the type of lace I want to get for mine.
Another pink one! Looks like embroidery or very fine lace on the top - can't quit tell. A more subtle trim than the last. Is that a satin ribbon rosette? Won't that make a huge lump that shows through your dress?
A more plain example, but still very pretty with the monochromatic lace along the top.
Pink again! Love the delicate white lace. Seems like lace along the top edge was the way to go.
A maternity corset. The woman would loosen the center and side lacing as the baby grew. Just thought this was interesting! That is alot of grommets. Look how close together they are!
Noticing a pink theme here? White beading lace with purple ribbon.
More pinkness, lace, etc.
As you may have noticed - most of these examples I found are pink. Should I dye my white coutil pink? I like these, but pink isn't really my thing. I don't have anything against it, I just don't necessarily gravitate to it. I had envisioned the white coutil with some light blue lace and flossing. hmmm. I can be so indecisive sometimes with my sewing projects!
I got some plain white coutil. I plan of getting some extra wide lace to trim with. Here are some period corsets I've been looking at for inspiration.
Love the color and the extra-wide lace. This is the type of lace I want to get for mine.
Another pink one! Looks like embroidery or very fine lace on the top - can't quit tell. A more subtle trim than the last. Is that a satin ribbon rosette? Won't that make a huge lump that shows through your dress?
A more plain example, but still very pretty with the monochromatic lace along the top.
Pink again! Love the delicate white lace. Seems like lace along the top edge was the way to go.
A maternity corset. The woman would loosen the center and side lacing as the baby grew. Just thought this was interesting! That is alot of grommets. Look how close together they are!
Noticing a pink theme here? White beading lace with purple ribbon.
Love, love, love the fabric on this one. Once again - pink, wide lace, beading. Very feminine
More pinkness, lace, etc.
As you may have noticed - most of these examples I found are pink. Should I dye my white coutil pink? I like these, but pink isn't really my thing. I don't have anything against it, I just don't necessarily gravitate to it. I had envisioned the white coutil with some light blue lace and flossing. hmmm. I can be so indecisive sometimes with my sewing projects!
Thursday, September 29, 2011
Yard Sale Finds
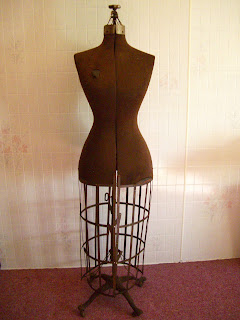
This might be to coolest yard sale score ever. Check out my new dress form!
I got her for $45 (talked down from $60). The adjuster on top says "Pat. Pend. 1908," so I assume she is about that old.
I don't know how useful she will be, her proportions are crazy - The smallest she can be is a 38 bust and 26 waist, and you can only adjust all the measurements at once, you can't adjust each separately like the newer ones. Much larger than my bust and a smaller than my waist. She also totally has an "S-curve" the way she is standing.
I also got this for free;
It was towards the end of the day and the people were packing up their yard sale had already put this out to the curb to throw away. I asked how much and they said free! It is definitely a nice decor or prop piece though not usable. Two of the hinges are detached from the bottom.
Seems possible to fix if I really wanted to. I could probably find some of those little screw/pin things at a hardware store, no? i have no idea how old it is, I am not up on my luggage history, but it seems pretty old to me. What do you think - 40's? 50's? Here's the inside.
I think the best time for deals when yard sale-ing has to be the end of the season, people either sell the item now, store it for another year, or throw it away - so any price is better than nothing.
Thursday, July 21, 2011
1940s Belt - Missing Something?
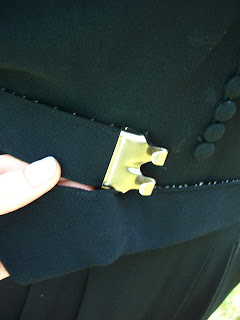
I have this nice black evening dress from the 1940s. It has a matching belt but I can't for the life of me figure out how to fasten it. One end just has two hooks on it. I think something is missing - a buckle that was attached to the two hooks. Any idea what is missing here and where I could find a replacement?
Tuesday, May 31, 2011
1949 Singer Sewing Book
Look what I picked up at an antique shop this weekend! This book is copyright 1949 and it is amazing! I just love the illustrations and vintage sewing techniques like the 31 different seam finishing methods or the 14 hem finishes.
The author gives advice on how to successfully complete sewing projects. Mostly stuff we've all heard before like "plan for sewing time" and "assemble and organize your materials before starting to sew." Here's what she says about preparing yourself physically;
When you sew, make yourself as attractive as possible. Go through a beauty ritual of orderliness. Have on a clean dress. Have your hair in order, powder and lipstick put on with care. Looking attractive is a very important part of sewing. Sewing must be approached with the idea that you are going to enjoy it, and if you are constantly fearful that a visitor will drop in or your husband come home and you will not look neatly put together, you will not enjoy your sewing as you should. Therefore, spruce up at the beginning so you are free to enjoy every part of sewing you do.
God forbid your husband comes home and sees you without your lipstick! That would cause way too much anxiety and you will be too much of a nervous wreck to sew!
Tuesday, May 10, 2011
Opera Renderings
Here are some new renderings for an opera I am currently designing.
I'm renting all of the men's Victorian costumes.
The first three here are the chorus of eight. That's right; 8 of the same exact dress. oI am making them from this pattern; view E (second from the left).
I'm drafting an A-line skirt onto the blouse pattern to make it a bias cut cowl neck dress. I'm then going to ombre dye them with the three colors pictured. They will all have a bronze sequin belt, a monocle, and a white wig with silver tinsel pieces. For the leader of the chorus I'm going to do a different sort of hand dyeing technique, more on that later!
Subscribe to:
Posts (Atom)


